Front Wheel Bearing II.. a different approach..

As it stand's.. Aveo parts are now populating auto parts yards..  This includes a part that provides a work around to pulling the bearing's and replacing them. (meaning having to buy a the special bearing removal tool or find a shop press with the right set-up)

  I lucky for everyone, I need to replace my  left side bearing once again.  I bought a cheapo $19.99 "duralast" bearing 19k miles ago. It's groaning loudly above 30 mph ,making the car seem unsafe to drive.

I was able to find a local yard that listed a few Left side spindles. I selected one from an '07 that was said to have less than 60 miles on it.  Whether thats true or not who knows, but the hub moved smoothly and a little tight.  Whereas the hub on my car - once removed- spun freely and very loose and noisy.

So.. Here's a set of pictures and some details of my spindle swap-out.  

Took about 4 and 1/2 hour's. (this included stopping to take pictures).
Total Costs incl 8% NY tax.:

Spindle 48.50
Ball joint tool 26.50

1st I pulled the car into the 'shop' and got a floor jack in position.

Before any jacking I loosened the lug nuts AND  the Hub Nut.

Note: If this is your first time loosening the axle nut, see the original wheel bearing removal I posted.
Since mines been off before It wasn't so hard to remove this time.


Get the wheel removed and the car jacked up.
You may want to use a back up support should the jack fail.


I chose to tackle the usual stubborn bolts first. Here, before using my electric impact I just tried a a hand driver with the right size phillips head.  Because I used anti seize last time I did the brakes they came right out. :)


Next I loosen the tie rod end nut.  3/4 socket size I believe. I use a heavy duty 1/2 drive ratchet.


Here is the Tie Rod / Ball joint remover I bought for 24.99 It worked great.


Here's the tool mounted up and ready to pop the joint free.

It's a mighty POP indeed so be ready for it.


After the tie rod was free, I removed the brake caliper. Just the 2 large bolts and tire iron/ prybar to work it free.  I undid the brake hose grommet and hung the assy. up on the strut coils.

I used a small piece of bailing wire to keep it from falling.

Once the brakes were off I tried to get the ball joint tool on the lower ball joint but couldn't, untill I undid the upper the strut bolts. (17mm or 11/16)
And also slid the out of the spindle and up out of the way.. as shown below..
 Once in place.. a little muscle a few ratchet turns and the mighty POP as it goes free of the spindle.

If your spindle comes with the lower ball joint Then this step is a little easier.  Just remove the lower 2 bolts on the lower control arm.

So here's everything just before the spindle was free to remove.

For installation of the new spindle, I prepped the axle splines with some anti seize. I slid the spindle onto the axle. Due to some rust on the new spindles splines it was a little tight but It eventually got seated with a little muscle and tightening the axle nut to draw it into place.

Install the spindle to the strut using one or both of the upper strut bolts at this time. No need to tighten the nuts yet.

 Now place the spindle on the LBJ you just popped free. Of course making sure first, all surfaces were clean and nice.

The nut will try to make to ball joint spin. What I had luck doing was placing another jack under the LBJ and lifting until the weight of the car kept from spinning. I slowly brought the nut down tight.

The rest was a process of reassembly and was about as easy as disassembling it all.

Below is a pic of the tool's I used to get it done.  Electric impact is nice but optional.


Front wheel bearing DIY..


Mine came with these 7 pieces. Long bolt + Bearing (on the bolt). A nut.  The adapter pieces
and the blue bridge as shown.
Here is the GM tool.

I found it on Ebay, much like these ones here..

Ebay Wheel Bearing Tool

The tool is from Kent Moore and the part number is J37105. Cost me about $25. @$32 with shipping.

The Factory Service manual for an '04 calls for this tool.
However the instructions were slightly different than what I found on mine. Perhaps because mine is a non ABS car.  The differences, meant I had to improvise, and use some larger 1/2" drive sockets as spacers. And also to pull the old bearing out.
1/2" drive size, so the long screw could get through them.

Possibly the tool/manual was revised for an '06? Who knows, but I made it through, and made this DIY so you don't have to be confused..

You can ONLY use this type tool.
 I tried some bearing removal "slide hammer" rental from an auto parts store and it will NOT work.
You can take the entire spindle off and have someone utilize a shop press as well., but they better have the proper size adapter to install the bearing. Pressing on the wrong part can destroy the new bearing.

In any case, lucky your here to see what I needed to do, to get it done.
Excuse the tool mess, pic taken after the job was done.

Tools and Supplies List:
Wheel bearing grease.
Large Axle Nut Socket,
High quality 1/2" ratchet or breaker bar.
Cheater Pipe. (jack handles work well).
A length of something to wedge between the brake pedal and
the lower seat front. (again, a jack handle worked well for me).
2 jacks, and some safety stands.
Multiple 17mm box end wrenches, + others and sockets.
An adjustable wrench. 
A small hammer. 
Needle nose pliers.
A bit of picture hanging or tying, type wire. (solid and strong but thin and bendable) 
I found mine at a home improvement store.  
Rags, gloves, hand cleaner. etc. 
Oh yeah, a Dremel tool with some cut off wheels and a vice.
A micro torch, or regular propane torch optional.


Will continue this asap!  Stay tuned..

Here's a cheapo..
(red insert)               and here's a better one.. SKF, Black insert.


The bearings pictured above are an example of the bearings I have installed in my car.

I bought mine at a local Autozone store. They were similarly priced and colored. The 'Duralast' cheapo I bought  was red like the one pictured, and the Timken upgrade was like the one in black. Both were a few dollars more at the store.

It's like a durability test to see if the more expensive one lasts any longer than a cheapo.

You can order from the above links or shop around the net. Timken, National, and SKF are the makers you'll find. There is one bearing manufacturer called "Auto7" that claim to be the OEM manufacturer and they want $105 each!   I chose a budget bearing.

So First you'll need to break the 'Axle Nut' free.  This sucker is on there at 200ft lbs. So you'll need to chock the wheels. Apply the brakes. and bend the locking flange back on the nut.

I did this with a small flat bladed screw driver and a hammer.  I had to slice the flange a little bit, but I was still able to re-use the nut.  (this is what I've done, no guarantee's if this is the recommended way).

Here's a tidbit of info.  The first bearing install I did came with a new axle nut that was thinner (less threads) than the original. This sucker stripped out on me and nearly ruined a perfectly good axle in the process.

I'd reuse the originals, or be sure to get an exact replacement...probably from a dealership.


Here I have my 1/2 inch socket wrench supported by a floor jack. I have the special socket I had to buy for the axle nut, and a short extension socket in between that helps keep the breakers bars away from the paint.

For breaker bars I have 1st the steel handle from an old floor jack. Then after that I have another piece of pipe about 3 feet long.  Over all I can get about 4.5 feet of needed leverage to bust this sucker free,.

I block the brakes with another piece of the same handle, by wedging it between the seat and the brake pedal.(see the timing belt post for a pic)

I carefully apply some slow, even pressure on the handle and it breaks these things free.  Might break free quick so be ready.

Once thats free, you can loosen the lug nuts, jack the car up SAFELY, and remove the wheel.

Next I started on what could be the next hurdle, if these things are really frozen on..The screws that hold the caliper in place.

For mine I used this handy dandy little micro torch I bought a Harbor Freight store.

As you can see the screws came out. I used an extra large phillips head driver, along with so slow steady torque.

Next time to remove the brake caliper. (already removed in the above pic).

 Pretty straightforward here..my bolt's came out without a fight. I undo the rubber grommet that holds the brake hose to the strut. Then I can hang the caliper on the strut. Up and out of the way.


 I had to hammer my brake rotor off. This pretty much ruined it, although I got a few more miles out of it. They were old anyways so you might might to add in a new brake rotor to your list of things to buy $$.
Here, some 17mm (11/16 should work, but not as good as the metric) box end wrenches did the trick. For getting the spindle disconnected, and the axle shaft out of the way.


One of these can electric impact drills can speed things up nicely.

more 17mm wrenches for the bottom. As you can see I doubled up the wrenches for leverage.
Not to hard to break free.  No space for the impact, so these ones took some extra seconds.

TO BE CONTINUED 2/4/13

Front Wheel Bearing's, read this first..


  • Stories of worn Front wheel bearing's seem to be appearing more and more frequently on the 'net. This seem's to be somewhat common, so I thought this would make a good DIY. Especially with the experience I had with my passenger side bearing. 
  •  1st. The symptoms I experienced.. Noise. A loud low whirring sound that increased with the speed of the car. Independent of the speed of the engine. So loud I could no longer hear the engine to know when to shift, just had to watch the tach. The sound was misleading so I'd be revving the engine to 5k thinking I was still at 3k. Couldn't hear the engine at all. 
  •  I followed the online bearing diagnosis procedures, but BE CAREFUL Here. The wheel bearings diagnosis instructions say to drive the car (nornal reasonable speed) and steer (normally) to the left and right. This will indicate a bad bearing if the sound changes as the vehicles weight shift's from one side to the other. Sure enough, my Aveo was indicating it had a bad wheel bearing, but which side? 
  • Long story short, I also incorrectly determined that it was my drivers side, and I ended up replacing that bearing twice before I realized it was the passenger side. After all that ($$$ & Time) 
  • Here's how I determined which side was giving me a problem.. I set the parking brake and blocked the wheels. Jacked up the drivers side of the car so the front wheel was off the ground by a few inches. Started the car, put it in first gear and carefully let out the clutch, being sure the car didn't move or stall. With the wheel spinning I listened for noise and didn't hear anything more than usual.( by this time I had the 2nd new bearing installed in this side, so that was the result I was hoping for. Then I *CAREFULLY* reached above the spinning wheel and put my fingers on a coil of the strut. I noticed a small mount of smooth vibration. 
  •  I repeated the procedure on the passenger side and what do you know. Something didn't sound right. It wasn't making the loud sound it did when driving down the road, but there was definitely a light rough noise from this side of the car. A touch on the strut, and there was clearly a rough vibration. More than the other side. This is how I would diagnose which side was bad, if this happens again. 
  • Once you have determined for sure, which side is bad, you might be interested in changing them out yourself. You can save money doing this, BUT..
  • You'll need to buy a special tool. I found mine on Ebay for $30. Be sure your set is the one for the Aveo and includes all the parts. My tool is supposedly the right one, BUT...the 2004 manual I have indicates some procedures that didn't exist on my '06. I had to improvise on the spot. Good news is, I was able to get the job done without to much hassle, and this blog will help to sort out the same confusion you may encounter.. Sorry the pictures are rather blurry.
  • On to the DIY..!   >>

A little about me and this blog..

  • So you may be wondering who I'm am and what I'm doing with this blog.. About me. I'm really just a 40 year old 'Joe', from a western New York town, that has a knack for fixing things mechanical, and a need to do things myself (Read: Save $$).
  •  I also have a decent set of tools and I don't mind buying more. I also have some rented shop space for an older collector car I upkeep. I'm not ASE certified or anything like that. I'm shade-tree certified. 
  •  My Aveo is an '06 Special Value Model. So I don't have A/C to work around. It's also a 5 speed manual, So the information I provide may be slightly different than your model with other option's. Also, the Aveo was mostly the same from 04 to 08, so this information won't be valid for later model year Aveo's. 
  •  My intentions with these write-up's are not meant to compete with a factory service manual. It's assumed by me that you have access to these publications, as a supplement to the pictures and information I supply here. And as always Safety First. You use the information I provide at your own risk. 
  •  The links provided are a handy way to get the part's I used for the swap. In most cases they are the places I used to get the parts. I spend time searching out the best prices on the parts and brands I want, however, they may not be the cheapest available in your situation, so by all means, search out your best options.
  •  I like to be detailed and show you everything, but I in no way claim to be the 100% correct way to fix anything here. Let these posts simply be your guide. To see if you wan't to tackle these job's yourself, or pay your dealership/ local mechanic. These cars are getting to the point of needing service and being outside of the factory warranty, so I feel there is decent reason to create and continue this blog. 
  •  Currently the Digital Camera I have is failing so pic's aren't all that great, I apologize. Hopefully a better upgrade is near. 
  •  Thanks for checking out this blog, good luck and many happy safe miles in your Aveo's, & Wave's, etc!


More info coming..

Hellooooooooo, Aveo Owners!!!!! It's been a while, but here I am back to add some more maintenance items. My Aveo has been running along very well, and mostly trouble free so there hasn't been anything major to post. But the mileage is climbing, and wear and tear is taking it's toll on certain parts. Coming up shortly, I'll post my DIY front Brake Pad change, a Front Wheel Bearing DIY, and most importantly a Clutch DIY. I make the mistakes so you don't have too!.

Timing belt swap, how I did it.

Here's my '06 Aveo.

Get your car pulled into your work area. Mine is a 5 speed. To start with, I left it in 5th gear and set the parking brake.
I parked it with enough room to sit in front of the passenger side wheel. And get a jack on the frame just behind that wheel.

There will need to be room in front for you to work and get another jack underneath to support the oilpan when the time comes.


After removing the hubcap, I positioned the jack. (see pics)

Got the lug nuts broken loose, and then jacked the car up to get the wheel off and the car up a little bit.

I put a spare rim and wood underneath the car behind the jack cup, for saftey, incase the jack decided to loose pressure in the middle of things.


I lined the slots in the cup up with the frame seam. No damage occured, lifting here. Although I noticed the pass. door dragged very slightly on the striker when opened. Otherwise, no problems here.


Start By removing the Airbox.

You'll be able to see all the attaching screws.

Remove 3 bolts attaching it to the frame.

The Remove the intake hose clamps -see next pic.


This pic shows a handly little tool I have...Its a Battery powered Impact Driver from Hitachi.

This thing is so great for duties like this.

In this pic I have a 6mm (All fasteners are metric) socket on, removing the airhose clamps.

I removed both clamps and set the hose out of the way, back over the motor (this way you dont have to unplug any of the sensors (2).


I removed the splash shield using the 10mm nuts circled.


The red arrows below indicate 3 other screws to remove from underneath. See next pic.


You get the idea.


Put a wrench here and give the pulley a tug as if you were trying to tighten the bolt. This loosens slack and the serpentine belt slips right off.


Once that was off and out of the way I removed the crank pulley bolt.
* Take note of any markings on the bolt, this was a handy reference for me when re-tightening this bolt.
3/4 drive socket wrench, with an extender bar.

(This extender bar is from a heavy duty floor jack. - it also serves to apply pressure to the brake pedal when wedged against the seat.
(See next pic.).


This worked great when I didnt have a helper around, and the balancer bolt kept spinning the engine around instead of tightening or loosening. Even in 5th gear.


You can remove the balancer now (it falls off, no puller required) Keep your hand on it, or it could get damaged with a fall to the floor. Its about 10lbs.


Remove the bolt (faint red circle and arrow) holding the power steering line clamp, to the alternator's top bolt.

Save the nut in a container or screw it back onto the threads.
As long as its off, you'll be able to move the line as needed now.


Getting close to removing the motor mount, I took some time to support the motor safely.
As seen here, I used a 2 ton shop jack
with a shirt as an extra measure of protection against damaging the oilpan ( not too likely, but better safe than sorry)

I raised the jack until it just contacted the pan. Be sure not to go too high and start lifting the car by its engine.
-that would not be too good


With the airbox removed and the engine safely supported its time to remove the motor mount.

Your going to remove the 3 bolts around the part that says 'R2'
and the other 3 bolts in a row just above it in the pic.


Here, I took the top cover off before I actually removed the motor mount.
Either way is fine. There are 3 bolts holding it on.
There recessed but not to hard to find or reach with things out of the way.

Speaking of getting things out of the way, there's a rubber hose that needs to be simply unclipped from the top cover. I'm sure you'll see it.

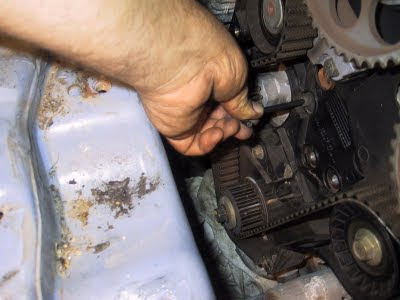
Now were getting close, there's the famed timing belt.

In this pic I also have the lower cover off. Again another 3 bolts. see next pic....

This picture showes the 3 bolts of the lower cover. The bottom 2 you can get to straight on from the wheelwell.

The top one is up in there, but still easy to get to.

Once the bolts are out it comes off with no hangups and you now have a clear view of the timing belt.


Once the upper motor mount is removed, you have acess to the next step, removing the inner motor mount.


Here's the breaker bar on the motor mount bolts 15mm and 17mm sockets used here. There on tight, but they broke free easily.


Here's the motor mount disconnected.
You can also get a sneek peek at my secret trick to make the job foolproof..the white marks I painted on the cams and the old belt.

More pics of this to come.

But first, on to the inner motor mount.

By removing the inner mount, you get full access to get a wrench on the water pump. That eliminates the need for the special waper pump adjustment wrench.

(twisting the waterpump adjusts the belt tension). More on this in a bit.

Here's the 4 inner motor mount bolts.

There easy to reach even with a deep well socket. The lengths are different.

Once this is out of the way, you can gain access to the water pump (which will need to come all the way out for a NEW GASKET - you need a new gasket here...The old gasket is crushed into shape. It could very well develop a leak once disturbed.

We'll get into that in a little bit.

1st, some very important steps...

1st Aligning the cam sprockets.

Refer back to the earlier photo showing the lower timing sprocket notch aligned with the notch on the engine.
All these marks need to line up exactly as described. This is very important.
DO NOT REMOVE THE BELT YET.
This pic shows the upper cam sprocket alignment. Both lines point to each other exactly at there closest point, while the lower sprocket is lined up with its mark.

**IMPORTANT NOTE**

Do not remove the belt until the following steps are completed....

THE CAM GEARS MOVE ONCE YOU SLIP THE BELT OFF.

This is because of some tension being created by open valves.
They dont want to stay lined up anymore. And you dont want to turn them backwards.

So because of this, you want to MAKE A MARK ON THE OLD BELT AND CAM/CRANK GEARS.

I Used an old, tiny artists paint brush laying around with some white spray paint, sprayed onto the bristles.

I marked each cam gear at its exact top tooth (use the tooth not the valley) the mark was made on the belt and the sprockets. My paint faded so be sure to use a bright solid color and be obvious about it.

The same for the crank pulley, ( again,see earlier pic up top) Be sure to mark all 3!

This step can save you a big re-installation headache. See pic..

Here are the marks I made.

There will be more on these marks in a bit, for now its time to get the water pump loosened. To get some slack so we can slip the old belt off and watch the cam sprockets magically move a few teeth.

I have not removed the belt yet.


In this pic I'm showing one of the 3 Allen head bolts surrounding the water pump (silver thing next to my hand).

You wont be able to break them free, If you only have a normal allen key like this. So here's a trick I used...

using a universal driver tool, with no chuck installed, it slips over the allen key end creating some needed leverage.


Here ya go.

The other 2 bolts are also accessible this way. They were a little too buried for the picture.

They can be seen from underneath the car as well. One is inset into the rear plastic cover. Just fish the allen key into the hole and you'll find it without to much trouble.


To be continued on 8 27 09

Timing Belt- wrap up...


Sorry for the delay. ...


Here's the rest of the pictures I snapped.


Not much more detail than I left you with.


This blog tool, makes a write up like this very time consuming and difficult. I found that changing the belt was easier than trying to get the pic's lined up right for this blog.


Anywas...lets get down to brass tax. One picture shows how used the driver tool, along with a hex key to break the 3 water pump bolts free. It was easy.


Since I wasnt replacing the water pump, just the gasket. I was able to cheat a little bit here...
The water pump wont come all the way out.
There is another bolt-on plastic cover that is in the way. To completely remove it requires the cam sprockets to be removed....way to much work for me.


So I cheated by simply removing the lower bolt(s) as shown in one of the pics.
This let me pry the cover back just enough to get the water pump away from the engine, and let me pry the old O-ring gasket off and put the new one on. This was a bit of a pain.
Get ready to catch a bit of coolant. and scratch your arm up finagling with the plastic cover that you'll have to be bending out of your way. Mine didn't break.
With that done, I re-intalled the water-pump with bolts on loose.
I used normal sized vice grips and they were able to grip the waterpump as shown in the pictures and rotate it as needed.
At this time I replaced the tensioner and Idler pulleys. It was only a matter of unbolting the old ones and re-installing the new pieces.
Now time to slip the new belt back on. (With the white markings transferred to the new belt).
I made sure to triple check that they were correct.
Slippling the new belt on was no easy feat. Because the sprockets move after the old belt comes off.
The timing belt. When Mined lined up initially there was a big 'U' dip inbetween both cam sprockets, and not enough belt slack left over to slip over the bottom cog correctly.
I had to use: 1. the help of a friend. 2. Start with the belt only halfway over the cam sprockets. holding the belt to the sprocket with my palm, turning one sprocket to remove as much of the 'U' dip as I could.
Turning the crank back a bit so that the belt tooth lined up with the correct marked groove in crank pulley.
Eventually I had everything on and correctly lined up.
Now it was time for belt tension.
I found this to be quite confusing. You could twist the water pump and spike the tensioner up into the correct zone...( you'll see a pointer on the spring loaded tensioner that moves and is supposed to line up with a mark also on the tensioner)
But as the belt would move , the tension would release.
This was even more evident as we removed the sparkplugs, relieving compression on the engine.
A tool end was inserted into one of the cam sprockets by me, to stop them from moving as I rotated the water pump for the adjustment. The tension was set as close to the mark as I could get it. And I left it like that.
I used a regular sized pair of vice grips from Lowes and they fit just fine. With tension set and the water pump bolts snugged back up it was all just a matter of reversing removal procedures.
The crank pulley bolt gave me some hassles, trying to turn the engine as I was trying to get it torqued down.
With the car in gear and the brakes appled (see pic in first Post using a bar to apply the brake pedal) I was able to get some torque on the bolt. I'm not sure if it was exactly as the manual prescribes (30 degree turn ect) but it hasn't come loose in 10k miles of driving.
Everything else went back on as it was removed.
My new accessory belt was a bit confusing to get back on. I had to review a pic of the aveo engine, outside a chassis, to get it right.
It might help to draw an outline of the thing before removing it, in those first steps.
I buttoned everything back up...Replaced my plugs and wires, and did an oil change.
She started back up as if nothing happened, and ran crisp and clean like the day I bought it.
I Hope yours goes as well as mine did! I hope this post was easy to read and understand as well as informative!
Best of luck with your Aveo!


Holden Barina | Chevrolet Kalos | Chevy Aveo | Pontiac Wave/g3| Suzuki Swift+
Daewoo Kalos | Chevrolet Luva